Work did not resume till mid June with the focus of getting it ready for the Airventure Cup race. Still, there was much to do. I had been flying the KR quite a bit and decided to race the KR instead and switched my efforts to getting it ready to race thinking that it would be a much easier project. That was not the case as I continually ran into issues with it and ultimately had to scratch when an oil change before the race revealed lots of shiny stuff floating around in the motor. Back to the Sonerai, the KR will have to wait until winter.
Seat Rework
The first thing that I needed to address was the seat. I was not able to get enough tension on the seat pan to keep it from hitting the torque tube beneath. I opted to use steel piano hinge to support it which worked out very nicely. It takes 30 seconds to get the seat out or in.
However, due to the close tolerance pillow blocks, the torque from the the rear attachment caused the rear pillow block to bind and I had to come up with a method of transferring the load elsewhere. I ended up making two adjustable pushrods and attached them to a ridged structure.


New Aux Fuel Tank
I was excited to run the AVC race, but to do so nonstop, I needed to get a little more fuel on board. I removed the 5 gallon tank from behind my head and was in search of a tank that would fit directly behind the seat. A 7 gallon spun aluminum tank would fit but I did not want to spend $185 for something that was going to be removed after the tip tanks were installed. I found a 7 gallon air tank aluminum air tank at Harbor Freight for $69 and began the process of mounting it.
Mixture Control System
The other project that would need completed was figuring out a way to adjust the mixture in flight. The Mikuni SBN has a thumb screw but I wanted to retain my regular mixture control. I ended up scrounging up some old lathe parts and built a rack and pinion system. The rotary motion from the setup connects to the carb via a modified speedometer cable.
Both of these projects are currently on hold since I don't need them to get the thing back in the air before the snow flys.
Prop Finishing and Balancing
The day before I left for Mojave, I tried to remove a messed up decal from the prop. I tried a bunch of different things to get it off. I tried to remove it with some acetone... 2 hours later, all of the paint was off of the prop and the damn decal was still firmly in place ; ) It got a quick coat of flat black paint and went back on for the event.The prop was way out of balance and needed to be finished properly. for paint, I used automotive sand able primer as a base and Krylon flat black and wet sanded it with 1500 grit paper keeping an eye on the static balance between coats.
The Cloudcars props have a 1/4" pilot hole in the center so I bought a perfectly straight piece of 1/4" stainless steel tube and put it on my Du-bro model helicopter rotor balancer. It is incredibly accurate, costs $27 and is more than the high dollar aviation balancer I usually use. If you are interested, check it out here: http://www3.towerhobbies.com/cgi-bin/wti0001p?&I=LXD712
 |
| Final static balance check |
 |
| A tiny piece of 200 grit sand paper is enough to drop the blade to the base! |
 |
| The final finish is an enamel clear coat wet sanded to 2000 grit for finish smoothness and a very cool flat black look! |
Valve Train Geometry
Since there were so many changes to the top end of the motor (new Revmaster heads, thinner base shims to drop the compression and new cam), I needed to reset the valve train geometry. The basic idea is that you want to have the valve at its half lift point when the adjuster screw is in line with the valve stem. This is done by shimming the rocker shafts and making pushrods of the proper length. There is a ton of info out there on the process so I will skip the details.
 |
| A custom bracket and a dial indicator is used to find the valve's half lift point |
 |
| Cutting the new pushrods to length on a lathe. If you have access to one, its the best tool for making the pushrods length identical |
Fuel System Revision
As posted in the past, the fuel system is fairly complicated. 3 tanks, redundant pumps, a fuel flow gauge and a carb with a return line make for quite a puzzle. I love the flow gauge and wanted to retain it so I had the carb's return line plumbed in after the transduce but before the pumps. While all of the ground tests were performed with the system, there are a number of problems with the design. The most serious issue was that there was no way for air or vapor to get out of the system. The carb would just pass it back to the pumps and the pumps to the carb in an endless loop. To address the issue, I was going to install a vent line just before the pumps. While the solution would work, I started to consider why the carb had a return line to begin with. The belly of a jet ski is a hot place and I assume that the return line allows the fuel to cycle back to the tank for cooling. Kind of sounds like the cowl of a turbocharged Sonerai... For now, the return line feeds back to the main tank and I will test the other idea in the spring.
Spar Taper Pins and Fuel Tank Revisions
The only way to gain easy access to the fuel system is to have the wings off of it and the main tank removed. Both of those items were not easy.
The tank removal issue was because of the difficulty of making hard line aluminum fuel lines in an area you can't get to or see. While the wings were already off, I decided to just bite the bullet and get it done.
The Sonerai's wings are held on by 6 taper pins, 4 in the main spar and 2 in the rear. The problem was that there is an aux fuel tank in the way of the nuts for the front taper pins. It took Tim and I 4 hours to get the wings off of it before Mojave and would have taken as much to get them back on. Again I opted to take the hard route and come up with a way to make the task easier.
Since I can't get the spar box out of the plane easily, I opted to JB weld a set of modified nuts and taper pin washers to the back of the spar. However, as I looked closer, I found that the guy that built the wings and spar box drilled the holes at an angle. Lots of options were explored and I eventually was able to glue the nuts in place using the taper pins as guides.
The pins are now screwed in from the cockpit side using holes that are cross drilled into the pins and a punch. To keep them from backing out, the cross drilled holes are safety wired. It now takes about 10 minutes to get the wings on and off ; )

 |
| Taper pins awaiting safety wire |
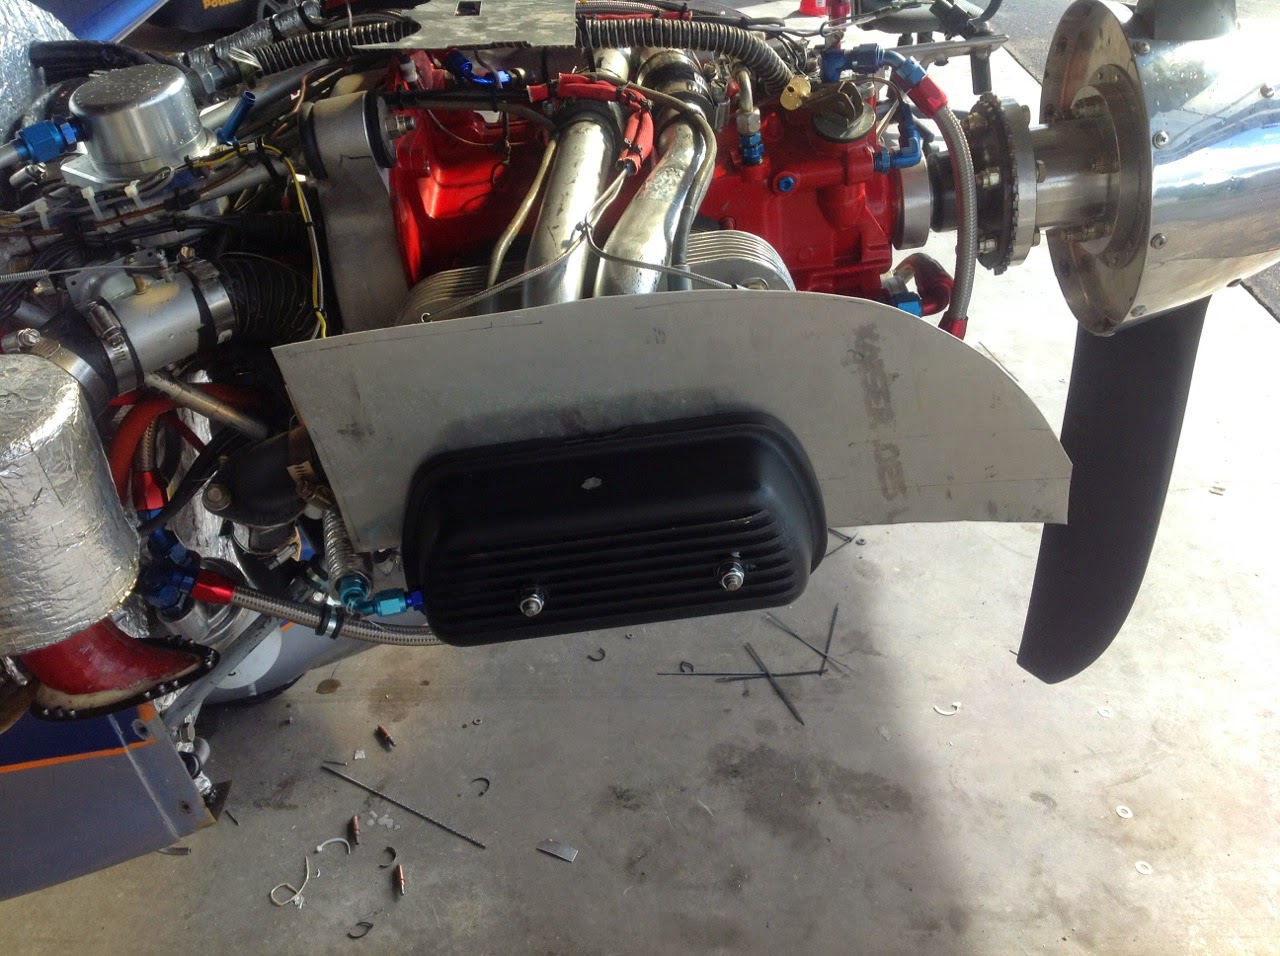
Controlling Heat
One of my primary concerns for the turbo project is all of the heat that its going to be dumped into a tightly fit cowl. As mentioned previously, the exhaust is ceramic coated inside and out and the hot side of the turbo has a blanket on it, but the starter, coil pack, mag and carb sits just above the exhaust collector. The first project was to make an enclosure for the coil pack. Its in the picture, but its hidden behind everything else back there. It's fed by 1/2" tube from the baffles. What is visible is the heat shield on the rear left cylinder's exhaust pipe. It runs within an inch of both the oil cooler and starter. the heat shield is a split tube over two small wraps of header wrap to prevent scuffing. The hose clamps keep everything in place.
To deal with the heat from the collector, I built a box around it that has a sealed top and an open bottom. A 1" tube from the baffles feeds cool air into the narrower top section and exhausts it directly in front of the cooling exit. Its a simple shape, but making anything on this thing serviceable is a nightmare. Its basically a clamshell of aluminum and stainless held together by piano hinges.

 |
| Closeup of the collector baffle and a glimpse of the coil shroud |
Timing Table Modifications
During recent test runs, the engine would not idle on the secondary ignition alone. I had the prop off of the airplane anyway so I verified that the digital ignition was firing when told to using a timing light. It checked out nicely but the problem was still there. I had the timing at idle set to 15 degrees BTDC. That may work well in a car that idles without any load, but this engine was not happy about it. With the engine running and the computer hooked up to the ignition, I increased the advance until it was happy. It needs at least 20 degrees of advance to idle smoothly.

Dynamic Prop Balancing
The difference between a dynamically balanced prop and static only balanced one is usually dramatic. All of the roughly 2 dozen prop variations that have been on it were both statically and dynamically balanced before flight. Its a process that usually takes a few hours but its worth it. After its complete, there is virtually zero engine vibration decreeable by the pilot.
This time around, I installed the probes and did the first calibration run and it was at .06 IPS. That is usually the kind of number you would hope to see after the balance job! That was easy...

This time around, I installed the probes and did the first calibration run and it was at .06 IPS. That is usually the kind of number you would hope to see after the balance job! That was easy...
The End is in Sight!
To date, it's been 26 months since its been apart. Its taken thousands of hours of research and work to get to this point, but the point of the project was to learn new things. I don't want to learn any more new things for a while ; )
The only thing standing between now and a test flight is the cooling baffles. The left side is 95% complete and the right side is at about 65%. Another side project that has to be completed before test flying is the completion of my helmet/mask conversion. Its a $50 ebay Chinese fighter helmet and a $19 military surplus mask. Neither comes with any electronics but you can still put together a good helmet and mask for under $200. For now, the mask is being fed by air outside of the prop arc just in case I end up with smoke in the cockpit. More on this in the future.


 |
| A full review and "how to" of the helmet and mask conversion will be posted in the future. |
 |
| Add caption |
No comments:
Post a Comment