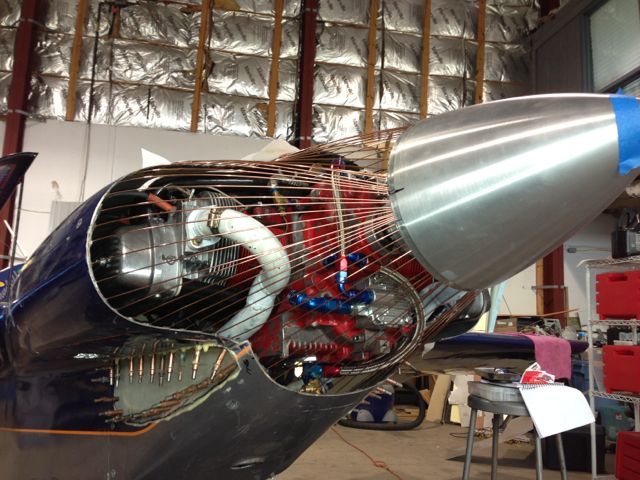
The first challenge was to figure out how to attach the welding rods to the existing part of the cowl. I tried the quick set JB weld first but took to long. The splines are glued on every 1" which meant I could only glue two on at a time (one on each side of the cowl.
I scrapped that method and decided to make pads on each spline and then attach them with a slow curing cyanoacrylate (super glue). This allowed me to use the accelerator used for building model airplanes. More on this in a bit.
The pads are made from the radiator repair putty that comes as a stick, the stuff that you mash together to get the hardening process going. I mashed the putty up, rolled it into a long worm like string and then cut it to look like rabbit droppings.
I put down a piece of clear plastic tape as release agent and laid the welding rods in. Using a piece of wood (also covered in plastic tape) and clamped them to make them flat. The finished product is a nice flat pad with lots of surface area for gluing.
Using the cyanoacrylate, simply put some glue on the pad, position it on the cowl by hand and give it a shot of accelerator. The bond is very strong and only takes about a second per pad.
Figuring out the angles for the rods to be attached took a good bit of trial and error. The rods on the top of the cowl above and below the spinner are aimed at the tip of the spinner. The ones coming in from the side converge on the 2" area where the cooling inlets will be. Once the welding rod is positioned I glued them to the spinner backplate.
Each time I moved the rods I covered them with sheetrock joint tape to get an idea of what it would look like.
After I was satisfied with the angles and shape, I cut the joint tape into 2" squares and applied them at a 45 degree angle to the spline it was centered on, wrapping the edges when possible to help keep the splines positioned properly.
After coving the rods with squares, I used lightweight sheetrock spackeling to cover the tape.


No comments:
Post a Comment